Tidy Tips: Upcycling Bread Bags

Like many of my tidy tips, this is another one of those I learned from my Mother. Speaking of my Mother, last weekend I threw their Golden Anniversary party, and everyone said it turned out wonderful! I thought everything went well, as soon as I have pictures back I will share them! Anyway, for as long as I can remember my Mother has saved her bread bags. They get the most use out of them around Thanksgiving and Christmas. That is when my Mother makes her famous rolls, she always makes tons extra, because we all love them so much, and then sends us home with an upcycled bread bag full of delicious rolls.


Lately, finances have been SUPER tight around here, so I have been using my bread bags for lots of things, for example, I buy a big block of cheese at Costco, then put it in a bread bag with a bag clip to keep it fresh. My favorite use lately though, has been to use them for recipes. One of my favorite treats is Muddy Buddies, the recipe tells you to put the coated cereal into a gallon bag and shake it up with the powdered sugar. I just can't get on board with buying gallon bags, I can do sandwich and snack, but I can't justify the money or waste buying more bags. SO, I use my bread bags, it works PERFECT. I have also used them to make sweet potato fries, I found that recipe HERE via Pinterest.


Just so you know I am telling the truth, here is my example. Depending on what mood I am in, I will either just shake out the bread crumbs or sometimes I will wash the inside of the bread bags with hot soapy water. Today, it was the shake out method. Here is my bread bag, ready to go.


For the buddies, I do a cup of powdered sugar on the bottom of the bag, and the other cup on the top, it helps to evenly distribute a little better.

The key is to leave a bit of air in the bag to shake everything around, shake it up good! My son likes to help me with this part, even at 15 months, he does a good job!

Here is the proof, perfect muddy buddies.

These ones are actually lemon buddies, YUM! I found this recipe via Pinterest as well, I am addicted it is true! Now I LOVE LOVE LOVE lemon, I am talking if my dentist hadn't forbid me from eating lemons, I would eat them like an orange, I love them that much. That said, this recipe needed a tiny bit more lemon than the recipe called for. So to remedy my lemon addiction, I added a little bit more lemon juice on the top of the buddies after they were done. These are an amazing, yummy summer time treat! Don't worry I still love the good ol' regular ones too. You can find the lemon buddy recipe in its entirety HERE.


Happy Upcycling!

S more's Simplified

It's August already, this summer has flown by! It doesn't help that it was in the 60's until the second week of June. I know a lot of people are complaining about the heat, but I love it! I am a summer girl and August makes me sad, it means summer is almost gone. Who doesn't love the grand summer tradition of S more's? We try to make some every chance we get. Saturday night we had a summer night of fun. Swimming, a BBQ, S more's, and an outdoor movie, it was grand. When I married my husband I learned a new way to make S more's. It is fun and a lot easier for the kids. I still love traditional S more's, but I have really taken a liking to the simplified version.

We started up the coals and waited for them to get just right...
Gathered the S more's supplies, yes you saw it right those are fudge striped cookies....
These babies are the way to simplify your S more's. The cookies act like the gram cracker and the chocolate is already there. Easier for the kids to manage, they don't have to worry about holding the chocolate on the cracker.

Once your mallows are perfect....
You slap them in between 2 cookies and you are good to go! Delicious!
What do you think? Have you ever tried S more's this way?

Something to think about Sunday...


I just wanted to share an inspirational quote that I found. I prettied it up via Picnik, and found the GORGEOUS "Country Road" photo here. I would love to take a walk down that very road with my sweet husband. It's with him that I see my brightest future, and I'm so grateful for his love, support, honesty, and strength.

DIY Summer Movie Night

I.LOVE.SUMMER. I love the heat, the outdoors, and all of the fun! Friday was the epitome of a great summer day. Swimming in the afternoon, dippy dogs for dinner, and an outdoor movie, it was too fun. My in laws own the lot next to them and have a sport court with a chain link fence. I had an idea that this would be perfect for an outdoor movie, but didn't know how to make it work, I didn't own a projector, and they are expensive. Luckily I married an amazing man, who is frugal, and with our powers combined, we made an amazing, inexpensive outdoor movie night.

This is possible for anyone, even if you don't have an empty lot, you could do it in your backyard or the side of your house. First chore is to find a projector. Since my husband is a student, he spends a considerable amount of time on campus, and has become quite familiar with what campus has to offer. One of the hidden gems on the campus of several Universities is their surplus and salvage. They sell all their "old" supplies at a huge discount since they initially bought it tax exempt. The real trick is patience, at our local University once the products have been on sale for 2 months, they go on DEEP discount. We got a fully functional Dell projector only 5% of its bulb used for SIXTY DOLLARS!!! It is a $1600 projector, you can't find a better deal than that! So the big task at hand was done. Most projectors hook up to a laptop, we used our Xbox, it worked great.

You will need a few extension cords for all of your plugs, my in laws have a bunch they use at Christmas time, with multiple outlets that were perfect. You will also need speakers, but just use whatever you have available. We have a surround sound system that we just packed up and took over, the quality was amazing.

The next task it the screen, originally we were going to buy this cheap sheet from IKEA, but my mother in law happened to have a bolt of white fabric, score! We sewed two pieces together to make our screen. To make the screen easy to set up, we sewed little strips on each corner and hooked it to carabiners.

The carabiners attached to the chain link fence and we were ready to go!
Here is the set up, the projector, Xbox, and speakers.
Since we had power outside I brought out the popcorn pumper for added fun!

We rented Rango from Redbox, here is my attempt at a picture with the movie going, not so great.
Everyone had a great time, don't forget bug spray!

We have had movie night twice already and plan on having a few more before summer is through!

Making Button Bracelets: Featuring Danielle of EatBreatheBlog

Danielle from EatBreatheBlog is sharing a super fun craft today. Perfect for a hot summer day to break out of the boredom!

Crafting Button Bracelets

Button bracelets are a quick and easy craft. Even if someone isn't the crafty type with tons of supplies, they will certainly have a stash of buttons around the house. Some people even make a hobby out of collecting vintage buttons. Now it’s time to gather up those buttons and put them to good use while making a fun accessory. New buttons may be used too, and fabric and craft stores have some really interesting ones to choose from. They’re inexpensive, but with the right coupons, you can practically get a whole bag for free! Furthermore, the design and color composition ideas are endless.

For this project you will need only a few things:
1/4" or 3/8" thick white elastic
An assortment of buttons
Needle and colored thread

Pick a mix of colors and sizes of buttons that is pleasing. Mixing new and vintage buttons gives a funky look. Smaller buttons in pastel colors give a daintier, more feminine look. Use a repeating pattern or all one-of-a-kinds. Stacking smaller buttons on top of larger buttons gives you a layered look for added interest and texture. Pick a thread that matches or complements the color of buttons chosen. Use a pop of color or clear nylon thread that can blend in.

Wrap the elastic loosely around the wrist and place it where a bracelet would sit comfortably, making sure it is not too tight or too loose. Cut to size with 3/4" for overlap and mark the elastic right past the overlap point. Fold the elastic in half and mark this halfway point, too.

Lay the elastic flat on a table to use as a guide for placing the buttons. Take the buttons and figure out the desired layout and how many buttons will be needed. Make sure not to place the buttons past the end mark made on the elastic. The design looks best if the buttons overlap each other a bit, so remember this when laying them out. Reference the pictures for help in placement. After the layout is done, the elastic can be sewn together by hand securely to form the bracelet.
Starting in the middle of the elastic, sew on the buttons one at a time. Knot the thread after each button is attached to keep it secure. To make the knots, thread the needle up under the stitches, pull the string through and thread the needle through the loop that is made and pull tight. Do this a couple of times to secure the buttons. Make sure to have the buttons overlap each other so the elastic does not show through. Keep sewing on the buttons until the bracelet is covered. Adjust the layout if needed to get proper coverage of the elastic. Try the bracelet on for size and admire the handiwork!

Button bracelets are fun to make and the design possibilities are endless. These also make great gifts and items for craft sales. Grab those buttons and make one today!

Thanks for sharing this fun project Danielle! Don't forget to check out her blog, EatBreatheBlog. Lots of great information on health, wellness, and life.

Would you like to do a guest post on A lil bird? We would love to have you feature a project, your blog, or anything that strikes your fancy. Email us at bagsnrags3 (at) gmail (dot) com, we look forward to hearing from you!

Dippy Dogs

Do you believe it, between all of the fun things we have been doing, I finally managed to get a post up! Woo hoo! Last month when I visited my parents in Southern Utah my Mom gave me this....

As my parents get older my Mom is cooking less and isn't needing all of her kitchen appliances anymore. I received the fryer and her popcorn popper, both of which I was super stoked about. I have to be careful, fried food isn't the healthiest, but I have some theories regarding it. First- I try to have good eating habits 90% of the time, the last 10% is reserved for fun, fatty, unhealthy food, because you can't miss out on life. Second- If you're going to have fried food, make it yourself. You know what is going into it, and no matter what it tends to be slightly healthier.
The reason my Mom actually gave me her fryer was because we were talking about must have summer treats. I was talking about feeling guilty for buying Otter Pops, and my Mom told me what I mentioned above. She was right, what is summer without Otter Pops, snow cones, and corn dogs. I was aching for a good home made corn dog, I am sorry, but the ones you buy in the freezer, YUCK! I am talking the good corn dogs, the kind you get on the pier in Santa Cruz, made fresh juicy corn dogs. Growing up, my Mom made everything from scratch, and corn dogs were no exception. Naturally, she had the recipe for me, we made them for dinner last night, and my husband loved them. He loved them so much he even talked about them on Facebook!

Dippy Dogs
1 1/2 Cup pancake flour.
(My Mom doesn't buy special flours, so here is how to make pancake flour: 1 1/4 C flour, 2 TBSP sugar, 1 TBSP baking powder, and 1/2 TSP salt. If you are using this instead of pancake flour, just use this formula instead of the 1 1/2 C, does that make sense? Use this mixture in ADDITION to the rest of the ingredients in this recipe.)
1 TSP sugar
1 1/2 Cup milk (I would actually recommend probably 1 1/4 Cup, I haven't tried it yet, but my batter was a little thin, I would like it thicker.)
2/3 Cup corn meal
1 TSP salt
Around 15 wieners
Mix ingredients until you have a smooth batter. The secret of making the batter stick to the wieners is to heat the wieners in hot water then remove from water and dry thoroughly with a cloth. Insert sticks into wieners, dip in batter, and fry in hot, deep fat. (I used Canola Oil, it worked perfectly.)

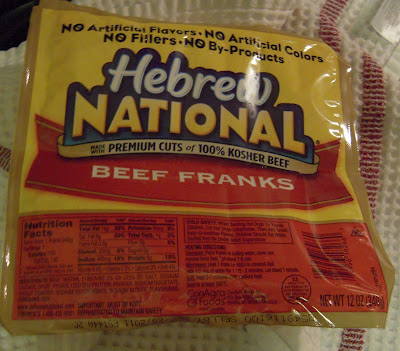
If you are going to make your own corn dogs, go all out, get the good stuff, none of the mystery meat. Get the 100% all beef franks. We LOVE the Hebrew National.
I used my kitchen aid mixer to mix the batter, worked like a charm.

I didn't realize until we started that we didn't have much oil. To solve that problem, I cut the franks in half, so they were mini dippy dogs.
I brought water to a boil and threw them in, sticks and all, for about 1 to 2 minutes. I dried them thoroughly with a dish towel.
Soaked them in the batter, nice and thick.
I placed them in the fryer using silicone tongs. Make sure you have silicone so they don't melt. Mine are these from IKEA. I set the oil on the 350 degree setting. It was perfect. They sat in there for about 3-4 minutes, just until they were golden brown. I would assume you could try this in a saucepan with oil, if anyone attempts it, please let me know how it goes!
Here are the finished dogs, they were sooooo good. I served them with fry sauce, I also like them with ketchup or mustard.
Nothing says summer like a good corn dog! What do you think!?!

O is for Ohdeedoh

I know, I know, we have totally been blog slackers lately. I blame summer and all of it's wonderful outdoor fun. We have more posts coming, promise! I cannot tell you how excited I was to receive an email telling me that the Cookie Monster Party would be featured today on Ohdeedoh! I have told you about my love of Ohdeedoh before, head over and check it out!