Showing posts with label birthdays. Show all posts

A Very Hungry Birthday!

Saturday was my son's second birthday party and he had a blast!  I must admit throwing a party while 36 weeks pregnant wore me right out!  Even though we just invited family, my husband and I have very large families, so there were quite a bit of people there.  We pretty much DIY'd everything and it all turned out great!

For the food we ate the same things the caterpillar did in the book, sausages (lil' smokies), a leaf (spinach salad), strawberries, watermelon, apples, swiss cheese, salami, and pickles.  Sounds kind of like a weird combo, but it was really good.  We had lemon water also.


I used Photoshop to make up food cards.


My husband and I tag teamed the cake.  He is the artistic one, so he did all the sculpting and the fondant.  One of his co-workers made the fondant for another cake and gave us her extra, super nice!  I made home made funfetti cupcakes using this recipe.  SO GOOD.
I used my Grandma's home made butter cream frosting recipe for the icing, I think it turned out cute!
 A friend had given me a caterpillar cupcake stand, he was fun!
A few months back at Target they were clearancing out Very Hungry Caterpillar plates, napkins, and cups, I think they were like $.50-$.75 per pack, score!

I made a fun banner using my Silhouette.
 We made a balloon caterpillar, all the kids got a kick out of it!
 We made fringey streamers for decor, cheap and cute! I also used this fun washi tape to hang them.


As the kids arrived we had them color a large caterpillar mural.  My husband printed it off at work, and we used washable crayons of course!  Here is the before.....
 And the after....
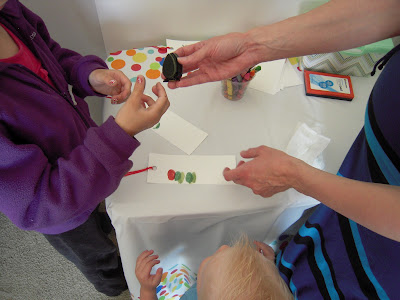
We had everyone make caterpillar bookmarks.  I got the idea from this cute blog.


I was trying to think of 2 year old friendly games to play and came up with this "Feed The Very Hungry Caterpillar" game.  We bought a giant poster board and used our projector to draw the images onto it.  We colored it in with markers.  I used some of our play food that he ate in the book to "feed him".  My son LOVED it, and so did the other kids.

For the favors I was out of ideas, when I saw this cute idea on Pinterest for Butterfly snack packs. (My Pinterest link doesn't have the original source, sorry!)  My son's favorite treat is Marshmallows, I thought the fruit ones would be nice and colorful and had forgot how yummy they are!  I also did Goldfish crackers for the younger kids.  I paired them up with some Very Hungry Caterpillar stickers that were also on clearance at Target.
Though I was absolutely exhausted by the end, it was worth it.  My cute boy has been saying "Happy Birthday Party" ever since!

A Very Hungry Birthday!---Invitations

Hi, remember me, SueAnn, yes I am still alive!  I know I haven't posted in ages, but this pregnancy has been really rough on me.  Just 4 short weeks and she'll be here, I can't believe it!  I do have lots of projects for my husband to do and me to post, HA!

Tomorrow is my son's SECOND birthday.  I really cannot believe he is 2!  Since I knew I would be throwing his party so pregnant, I have done a little at a time, during naps and at night (before 10pm), and I think it is going to turn out cute!  I think this party has been easier to plan than the last, maybe because I did break it up so much, instead of doing a ton at the end.  It was low cost too!

One of his favorite books currently is The Very Hungry Caterpillar, so I thought that would be the perfect theme.  A friend of mine threw her son's first birthday 6 months ago and also did The Very Hungry Caterpillar theme.  The invitations she did we so cute, I asked if she would mind if I stole her idea!  She gave me the go ahead and told me she had originally seen the idea at Pottery Barn.

The invitations are small Mason jars, with a caterpillar and a leaf inside.  I did multi colored paper on the tops and wrote the kids names.  I mainly just invited family, since I knew I would be too tired to invite too many people.


I wanted to type up the invites on the leaves, but they ended up being too small, so I hand wrote them.  On one side I wrote "You're Invited...", then wrote all the details on the other side.  I used my Silhouette to cut the leaves and the eyes of the caterpillar.  They were really quick to put together, a dozen only took me about an hour.  I just hot glued the pom poms together and then threw everything into the jar.  Each invitation cost less than $1.00.  My son's cousins thought they were great and have loved playing with the caterpillar.  My son isn't the most gentle, he ripped the eyes off of his. :)

The party is this Saturday, I am super excited, I think he will just love it!  I will post all the details next week, stay tuned!

Easy cupcake flowers...TUTORIAL

Happy Valentine's Day! I hope everyone gets to spend lots of time with loved ones. I woke up this morning to gobs of CHOCOLATE, and a gift card to a nail salon...loving cute, pedicured toes for SUMMER. What a WONDERFUL husband I have!!!

I wanted to share this great idea, my mom shared with me, for putting flowers on cupcakes.

You start with mini marshmallows and a pair of scissors. (Please wash your scissors BEFORE and AFTER) Cut your marshmallows in half~ corner to corner.


Next,gently push the sticky end of the marshmallow onto some pretty, colored sugar.


This is how the marshies look, when covered with the sugar.


Arrange them in a "flower" pattern on a frosted cupcake...


and, lastly, add a gumdrop to the center.


This was super easy, and we decorated 30+ cupcakes in less than an hour.


What do you think? Will you give it a try?

O is for Ohdeedoh

I know, I know, we have totally been blog slackers lately. I blame summer and all of it's wonderful outdoor fun. We have more posts coming, promise! I cannot tell you how excited I was to receive an email telling me that the Cookie Monster Party would be featured today on Ohdeedoh! I have told you about my love of Ohdeedoh before, head over and check it out!

P is for Party....

Although it didn't go just according to plan, my son's first birthday still turned out pretty spectacular I'd say. The weather didn't cooperate, but my Mother in law was nice enough to let us clean her basement the night before, so we could have the party there. I felt bad, because I was planning it outdoors I invited a ton of people, but she was so nice to help make it great! I know I went overboard, but my son loved it! He was pointing to all the decorations and balloons with the biggest smile on his face! It was all worth it.

My son loves to read and he especially loves his Sesame Street books that I picked up at the dollar spot over at Target. Between his love of those books and a picture of my younger brother's birthday from 1985, I had my theme, Cookie Monster. Well Cookie Monster, plus my added theme, "use what you have."

In that photo from 1985, my Mother had made an amazing Cookie Monster Cake, I tried to copy it. Here is a photo of the cake, that I made, MYSELF, from scratch, and decorated it MYSELF too, the frosting from scratch as well. I am really proud of myself, I am not artistic whatsoever.

Here is the present table, where I hung his "monthly" photos. A couple years ago I was at IKEA and they were blowing out wrapping paper at $.25 a roll, I pick up a bunch of rolls, the same pattern, but different colors. The blue was PERFECT for a Cookie Monster theme, so perfect in fact that we used it as a backdrop for our "photo booth."
Since I already had a bunch of scrapbook paper in different shades of blue, I just went with it. I really didn't have money to spend. I found this cute paper hat template HERE. We brought over my son's Cookie Monster stuffed animal, he was a perfect addition to the party.

You may remember my frames from my bebe shower. The "cookie jars" were my baby food jars with a little Cookie Krisp cereal and my little Cookie Monster figurines were from the dollar spot at Target.

I used my Silhouette for everything in this party, it was so fast, and I love how it turned out.
I made the smash cake too!
I used different jars from my pantry, even though they were different shapes and sizes, I think they worked out well. I added some ribbon and twine to jazz them up a bit. The large jar I found at Tai Pan Trading for a steal at $7.97! I added a fun Cookie Monster sticker from Michael's to the front. I made all of the cookies from scratch, well except the Oreos, those were my husband's request, we never have them at home.
Planning early is a must for me! I saved so much money by doing so. I knew I wanted "milk bottles", but wasn't going to spend money on them. So, in January I asked coworkers to give me any old Starbucks bottles they were going to throw away. I washed them and spray painted the lids and "voila" milk bottles! I got the idea for the Cookie Monster cups from Hostess with the Mostess.
Some really inexpensive decor, tissue paper pom poms, and a felt circle garland.
I used my son's "M" from his room, it worked perfect.
For the kid's we had a game to guess how many cookies are in the cookie jar. The prize was Cookie Monster book, Cookie Monster stamp, and Cookie Monster figure, all from the dollar spot at Target.
I really scored with the favors, and didn't spent a cent of my own money. Let me explain. My husband sold some of his old text books to Amazon, so we had some online credit. I purchased these letter and number cookie cutters with the credit, so they were free! I used bags I already had from other favors, and leftover ribbon. I cut out the tags with the Silhouette and had them say "This party was brought to you by the letter "M" and the number 1." I printed out some recipes for sugar cookies to go along with them and placed them in a milk crate my Mother in law had.
We set up a coloring table for the kids with coloring pages I printed off the PBS kids website. We used an elegant paper table cloth, so we didn't have to worry about crayon on the nice ones. We had foam stickers, stamps, and Sesame Street stickers.
Overall, everyone had fun, and it turned out great, even on a budget. I think I spent around $50 total, which I felt was really reasonable for a party of 50 people. You only turn 1 once!

Help!

This is not the posted I intended to start off my post vacation, but that is the way things went. I had an amazing time in Southern Utah, going on bike rides, playing in the park, and enjoying the 70-80 degree weather. Then I had to come back to the uncertainty of Northern Utah, with it's 40-50 degree weather and looming storms. Here is where I need your help. My son's first birthday celebration is TOMORROW, and it is supposed to rain tonight and lightly snow in the morning. It may or may not be done by afternoon. I have planned the party at 6pm, OUTSIDE under our pavilion. It is covered, but the temps will only be about 45. I DO NOT have an alternate location and I invited too many people to have it at my small condo. WHAT DO I DO? Has this ever happened to you? To say I am stressed is an understatement, I have put a lot of work into this party and really wanted to have fun celebrating my baby's first year. I need some advice, any suggestions, even if you just tell me I am hosed. I hope to have some pictures to share with you later in the week, but who knows! Also, there is no way to move the date of the party, I work nights the rest of the week including the weekend. HELP!

Perfect Hard Boiled Eggs

I wish I could say these eggs were ones I made, but alas, they are Martha's. She never ceases to amaze me with all of her talent. Though I may not be able to decorate them as cute as Martha, I do have a fool proof method for hard boiling eggs, for the perfect yoke and easy peeling. Before this I used to guess how long to boil the eggs, then some times I would end up with that yucky gray ring around the yolks. The other tricky thing was trying to figure out the perfect way to peel them without breaking the whites. You especially want them to be pretty if you are making deviled eggs, at least I do. I found this "recipe" in my favorite family recipe book (next to my Mom's of course), you may remember that is where I got my pizza dough recipe from. This method is the best, I have had lots of perfectly cooked hard boiled eggs since trying it. Also, a trick, before you peel your eggs, roll them on the counter, I have found this helps a lot with the peeling as well.

Perfect Hard Boiled Eggs
Cover the eggs with cold water, bring to a boil, cook 2 to 3 minutes, then turn heat off and let sit for about 20 minutes. Put in cold water, then store in the fridge.

-I have also found if you roll them around in your saucepan a few times before the water reaches a boil, it will put the yokes in a good place.

On another note, I am 95% done with all my birthday party projects. I have to make a couple things today, then the rest will be done when I get back from the Easter holiday. Here is one of the projects that got finished up this week......
My dot garland. I love it. I found this cute idea over at the Purl Bee. This garland was perfect for me for a couple reasons. First, EASY project for a non sewer like myself, you sew a line down the middle of the dots with invisible thread. So even if you can't sew in a straight line, which I can't, no one will know, because the thread is invisible. woo woo! Second, it is great because it is super cheap! My budget for this extravaganza is super small, so using some felt I already had, and invisible thread, dirt cheap. I even ended up buying 2 sheets of felt, it cost me a whopping $.50.

Have I told you my theme for my son's birthday? I can't remember if I have or if I am keeping it a secret. Any guesses with the color scheme from the garland?


Personalizing my POANG chair

This week is crunch time for me. My son's birthday countdown is 15 days. I have to have everything done this week, because next Monday I am going to Southern Utah to enjoy my parents and the Easter Holiday. When I get back I have Monday to bake up a storm and then his birthday is Tuesday, and I just want to sit back and enjoy the day. So, all my projects for the party have to be finished this week. It should be doable, I don't have a ton left to do.

My son LOVES books. He will crawl over and choose books over toys. He will sit and flip through the pages and he looks like he is actually reading. It is too cute. Because he loves books we decided to get him his own chair to sit and read in. As cute as I think the chairs from Pottery Barn are, who has $100 to spend on a child's chair? Not me. So we picked up the child's POANG from IKEA.
Really cute, but I wanted to give it a personal touch. So I found a cute font and cut out his name on heat transfer paper using my Silhouette. I am starting to really love that machine, BUT don't get me wrong, learning to use that darn thing has made me want to pull out my hair! It really is amazing though, it can do everything!
Once it was printed I ironed it on the chair pad. Since the pad was so thick I put a textbook underneath it and I had to press extra hard and hold it on longer to iron it on.
Here it is, I love how it turned out!
I really like it, I think my son will love sitting in it and reading his books!
What do you think?