Last Halloween Craft... Witches Broom

Okay, I had to get at least one witch broom put together this year. This broom was SO EASY, and made with stuff I found around my home. I started with a large stick that I found a couple weeks ago while on a hike, and some brown paper grocery bags.


I cut the bags into long strips, 3/4 of the way up the bags.


I wrinkled up my bags, and then straightened them out...


I painted them lightly with a quick coat of black...


I added some glitter, to make them pop...


I folded down the top inch of my bags/strips and secured them all together with a few staples.


I attached them to my "broom handle" with some hot glue.


Fancied up the broom with tulle and fabric strips...


The completed project...


Quick and easy and free...just the way I like it!

Last Minute Halloween Goodies: Weekend Website

If your taking your little ghosts and goblins around this weekend and need a last minute treat for a party, check out some of these fun ideas over at Prudent Baby. Prudent Baby is a fun website with lots of inspiring ideas and tutorials. I found the perfect way to ice a cake along with an amazing frosting recipe. Have a great weekend and a Happy Halloween!

Gorgeous Halloween/Autumn decor...

One of my best friends, Brandee, has a BEAUTIFUL home. She has so many FUN decorations for all seasons, but sent me a few pictures of her Fall/Halloween decorations. They are GORGEOUS! I thought I'd share...


GORGEOUS, right? You can visit her blog here for lots of pretty decor pictures from all the SEASONS and Holidays.

Soft Ginger Snaps

Remember the treat I mentioned when we were putting together our Countdown to Thanksgiving Turkey? I thought I would share what we made. This recipe is always fun to make in the fall, they are delicious. I only make them once or twice a year though, as our good friend Cookie Monster would say they are a "sometimes food".

A coworker gave me this recipe a few years ago, it is originally from Nikki Evans of New Jersey.

Soft Ginger Snaps

4 C. flour

2 TSP ground cloves

1 TBSP baking soda

1 TSP salt

4 TSP ground ginger

4 TSP ground cinnamon

2/3 C butter

2/3 C shortening

2 C sugar

2 eggs

4 TBSP molasses

Mixture of cinnamon and sugar to roll cookies in

Combine (I sifted) flour, baking soda, cloves, salt, ginger, and cinnamon; set aside.

Beat together (I used my Kitchenaid Mixer) butter, shortening, and sugar until fluffy. Stir in eggs and molasses until well blended. Add flour mixture and beat until smooth.

Pinch off and round dough into balls and roll in the cinnamon sugar mixture. Bake in a preheated 350 degree oven for 8 to 10 minutes (I did 10, they were perfect). Don’t bake too long, they will be soft and looked undercooked, even when they are done.

This makes about 60 cookies, so I was very glad we had cousins over to share with and take some home. These would also be fun to take to neighbors, you don’t want them just sitting around the house or you will be tempted to eat them all!


One Dollar Wednesday...Wendy Witch

I'm so late posting today! Have you ever had super good intentions of making a FABULOUS something, and when you gave it "your all" it still didn't turn out? Well I found a picture of THE CUTEST Halloween Crows on the Internet. I thought I'd throw something similar together.


After hours and hours and hours of trying, I decided to start over!

This time, I had no idea what I'd put together before I went to the dollar store. I went to "Honks" dollar store, and was inspired to make a witch! Look at all the great stuff I got there...


Well I started by sewing a face into the heel of one of the green socks...


I added eyes and closed the sock up...


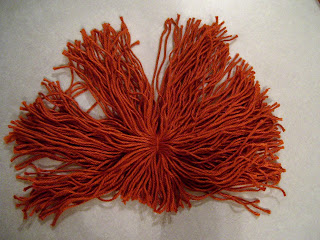
I made a wig by wrapping some yarn around a rectangle... my rectangle happens to be a favorite childhood book...Thanks Mom!


Gave that wig a trim...


Sewed some witch clothes and a hat with black felt...


Added a tag, also from the dollar store. (Aren't they CUTE!)


I tied her onto my super cute polka-dot bucket, with lots of tulle, and ended up with this...


I think she'll be adorable holding all our Halloween goodies!

Around the Town Tuesday featuring... A Wild Witchy Weekend


Ohhh what a FUN, fabulous weekend I had! My bestest friends came up to visit for a Wild Witchy Weekend. We all got dressed up as witches, and joined HUNDREDS of other witches at Gardner Village.


We saw the CUTEST decorative items...


We made lots of new witch friends...


We even happened upon a few FAMOUS WITCHES...


There were Goblins and Ghouls too...


I think we'll have to make this "WITCH~FEST" and annual tradition!

Countdown to Thanksgiving Turkey

I often feel like Thanksgiving is a looked over holiday. With all the excitement surrounding Halloween and Christmas, sometimes Thanksgiving is left out. I LOVE Thanksgiving, I love spending time with family, and I love that we have a holiday to recognize gratitude. I think that Thanksgiving is a great opportunity to teach our children about the importance of gratitude and to focus on our blessings. This past week for Family Home Evening we decided to do just that, focus on our family's blessings and on gratitude. Halloween and Christmas have their countdowns, I don't think Thanksgiving should be left out, so we made a "Countdown to Thanksgiving Turkey."

To make this craft I used:

-2 Styrofoam balls, one large, and one slightly smaller
-Brown spray paint
-Popsicle sticks
-2 red pipe cleaners
-A foam turkey face
-Colorful cardstock
-Hot glue
-A glue stick
I printed each family member their own thankful sheet for them to write down blessings. I did twenty five total (for the countdown) and the cut them into feather shapes. If you trust little hands, you can have them cut out their own, in my house Mom and Dad cut out most of them. Then we talked about what gratitude was and wrote down all of the things we are grateful for. Of course one of the things I am grateful for is food. :) After they were cut and filled out, we used glue sticks to attach the feathers to popsicle sticks.
We then let Daddy assemble our turkey while we made treats. We took the styrofoam balls outside on skewers to spray paint them, then left one of the skewers in and cut it in half. We used the skewer to attach the head and the body, you could also use a popsicle stick to do the same job. Then we flatted the bottom of the body ball by pressing it on the counter, so our turkey would sit up.
Daddy then poked the feathers into the body part of our turkey. As much fun as this part is to let the kids do, I wanted to reuse this guy next year, so we had Daddy do it.
For the turkey's face I had found this foam turkey kit for $1.99 at Micheal's. We used the face and attached it to the head of our turkey with hot glue.
We made some feet with pipe cleaner and our Countdown to Thanksgiving Turkey was complete! Starting November 1, after dinner each day we will pull out a feather and talk about the blessing that the member of our family wrote down. We will talk about why we are grateful for that blessing and what it means to be thankful.
Here is a view from the back, the feathers became to heavy for our turkey, so we ended up using an extra popsicle stick to prop him up, from the front you would never know.
Here is another front view of our turkey. I think he turned out really cute and I am excited to continue this tradition for years to come!